
The Vitamin D Deficiency test created by Smith BioMed is an at-home test that quickly tells you if you are vitamin D deficient or not. Our easy-to-use and accurate at-home tests can give you a result in 10 minutes, giving you the freedom of not having to wait for doctor appointments and lab testing.
Before we go into why you should test and how the test works, we want to talk about why vitamin D is important for overall health and well-being.
Why Should I Test for a Vitamin D Deficiency?
Sufficient levels of vitamin D give us many health benefits, we also need it for simple functioning. It plays a crucial role in multiple bodily functions, and low levels can lead to various health issues.
Prolonged vitamin D deficiency can lead to health issues over time, including weakened bones, reduced immune function, and mood disturbances. Testing enables you to take proactive steps to maintain your overall well-being.
Symptoms of low vitamin D can include persistent fatigue, bone pain, muscle weakness, low mood, or frequent infections. If you belong to a group with a higher risk (like older adults, people with darker skin, or those living in northern latitudes), testing for vitamin D deficiency can provide valuable insights.
Vitamin D has been shown to;
- improve bone health,
- give immune support,
- help with mood regulation,
- contribute to heart health,
- improve muscle function,
- help with pregnancy and foetal development, and
- have a positive impact on skin health.

How does this test check my vitamin D levels?
The vitamin D Rapid Test Cassette is a rapid test for the semi-quantitative detection of 25-hydroxy vitamin D (25 (OH) D) in human fingerstick whole blood. It can be used to screen for vitamin D deficiency.
What does the test include?
Materials provided in the boxed test include the following, alongside easy-to-follow instructions:
- Test cassette
- Capillary dropper
- Buffer
- Alcohol pad
- Lancet
- Instruction leaflet
- Colour card
How to use your test when it arrives
- Wash your hands with soap and rinse with clear warm water. Open the foil pouch and get out the Cassette-place on a flat surface
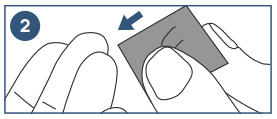
- Use the provided alcohol pad to clean the fingertip of the middle or ring finger as the puncture site.
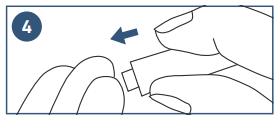
- Carefully twist and pull off and dispose of the round cap of the lancet.

- Press the lancet, against your fingertip on the side from where the cap was extracted. This will allow the lancet to pierce the skin. The tip of the lancet retracts automatically and safely after use.
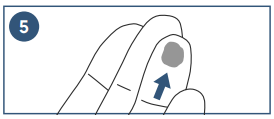
- Keeping your hand down massage the end of the finger to obtain a blood drop.
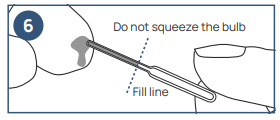
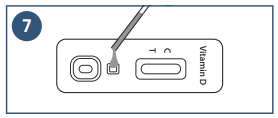
- Place the capillary dropper in contact with the blood without squeezing the bulb. Let the blood flow into the dropper until it reaches the indicated line. Massage your finger if more blood is needed to reach the line.
- Put the blood collected into the sample well marked ‘S’ of the cassette, by squeezing the dropper bulb.
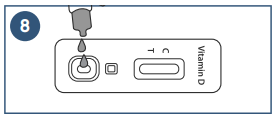
- Wait for all the blood to be in the well then unscrew the cap of the buffer bottle and add 2 drops of buffer into the round sample well, marked ‘B’, of the cassette.
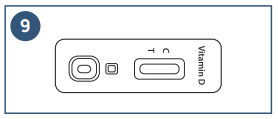
- Wait for the coloured line(s) to appear. Read results at 10 minutes. Do not interpret the result after 20 minutes.
How do I read the results?
Please refer to the illustrations below and compare the T line intensity with the colour card provided with the kit.
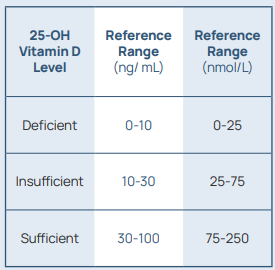
 Deficient: Two coloured lines appear. One is in the control region (C) and another should be in the test region (T). The line intensity in the test region (T) is equal to or darker than 10 ng/mL line depicted on the colour card provided with the kit.
Insufficient: Two coloured lines appear. One is in the control region (C) and another should be in the test region (T). The line intensity in the test region (T) is darker than the 30 ng/mL line and lighter than 10 ng/mL line depicted on the colour card provided with the kit
 Sufficient: Two coloured lines appear. One is in the control region (C) and a faint coloured line appears in the test region (T). The line intensity in region (T) is equal to or lighter than the 30 ng/mL line depicted on the colour card.
 Excess: One coloured line appears in the control line region (C). No coloured line appears in the test line region (T). If the result is excess, it is recommended to consult a physician.
 Invalid: Control line fails to appear. Insufficient specimen volume or incorrect procedural techniques are the most likely reasons for control line failure. Review the procedure and repeat the test with a new test. If the problem persists, discontinue using the test kit immediately and contact your local distributor.
You can purchase this test from Chemist Warehouse, Zoom Pharmacy or at your local pharmacy. If you have any questions or concerns about testing your vitamin D levels with our at-home testing kits please don’t hesitate to get in touch.